$USER@bit-of-a-byte ~ $ cat /var/log/pages/thothbackup---stage-0.md
ThothBackup - Stage 0
Environment & Hardware Setup
Project Contents
- Stage 0 - Environment & Hardware Setup
- Stage 1 - Server Configuration & Hardening
- Stage 2 - Client to Server Syncronization
- Stage 3 - Establishment of Local Repository
- Stage 4 - Preparation for Remote Syncronization
- Stage 5 - Remote Syncronization
- Stage 6 - Scheduled Data Integrity Verification
- Stage 7 - Restore Capabilities
- Stage 8 - Conclusions
- GitHub Repository
Introduction
This section will be divided into several parts. In the first part, we will talk about the environment that the server exists in. This will handle things like power and networking, basically everything that exists outside the server. Next, we will take a look at the server itself, and any changes that have been made to it. We will then discuss the currently used storage devices. Finally, we will talk about things that could be improved with this setup, and any potential changes that could be made to increase security.
Environment
Location
Everything lives in a TV-stand-esque cabinet inside the living room of our 800ft^2 apartment. The Mac Mini and the storage devices sit on a little shelf above the cabinet portion so they have ample access to fresh air, and the other devices sit inside the closed portion of the cabinet. The cabinet is actually right next to my bed, so in the event of a power outage the beep would theoretically be loud enough to wake me up.
Networking
The Mac Mini is connected to an Ubiquiti EdgeRouter Lite via a Netgear GS180v4 Unmanaged Switch. The WAN connection to the router is a 100mbps symmetrical fiber connection that will eventually be upgraded to a 1Gbps symmetrical fiber connection. The fiber is coverted to ethernet via a GPON to ethernet conversion jack. Cabling from each point is provided by LinkUp Fluke Certified Cat7 S/FTP Cables. While I don’t actually think these cables are any better than any other cable, I like the design of them and the way they feel. Besides, having an included Fluke report with each cable certainly can’t hurt.
Power
The Mac Mini is connected to a small battery backup. The battery wouldn’t be able to power it for the entire duration of the outage, but the theory is that it would allow time to get everything successfully and safely shut down.
Additionally, the router that the mini connects to the internet through is on the same battery. This is for the same reasons, as the router is an EdgeRouter and sudden shut off could potentially cause corruption to the boot image.
Finally, any and all storage devices that the server uses are connected to the battery as well. This ensures that any writes will be able to complete successfully.
The battery is connected to mains power a short distance away.
Server
Base Model
The Mac Mini that is being used is an A1176 Mac Mini with an Intel Core 2 Duo processor. You can see the original specifications of the Mac by following the link above. The Mac was purchased by me second hand for about $100 and some change and came with a whole host of accessories that are not in use at this time. Unfortunately, this Mac was one of the last ones before Apple switched to using a 64-bit EFI for the system firmware. You will read more about why that is unfortunate during stage one.
Upgrades & Modifications
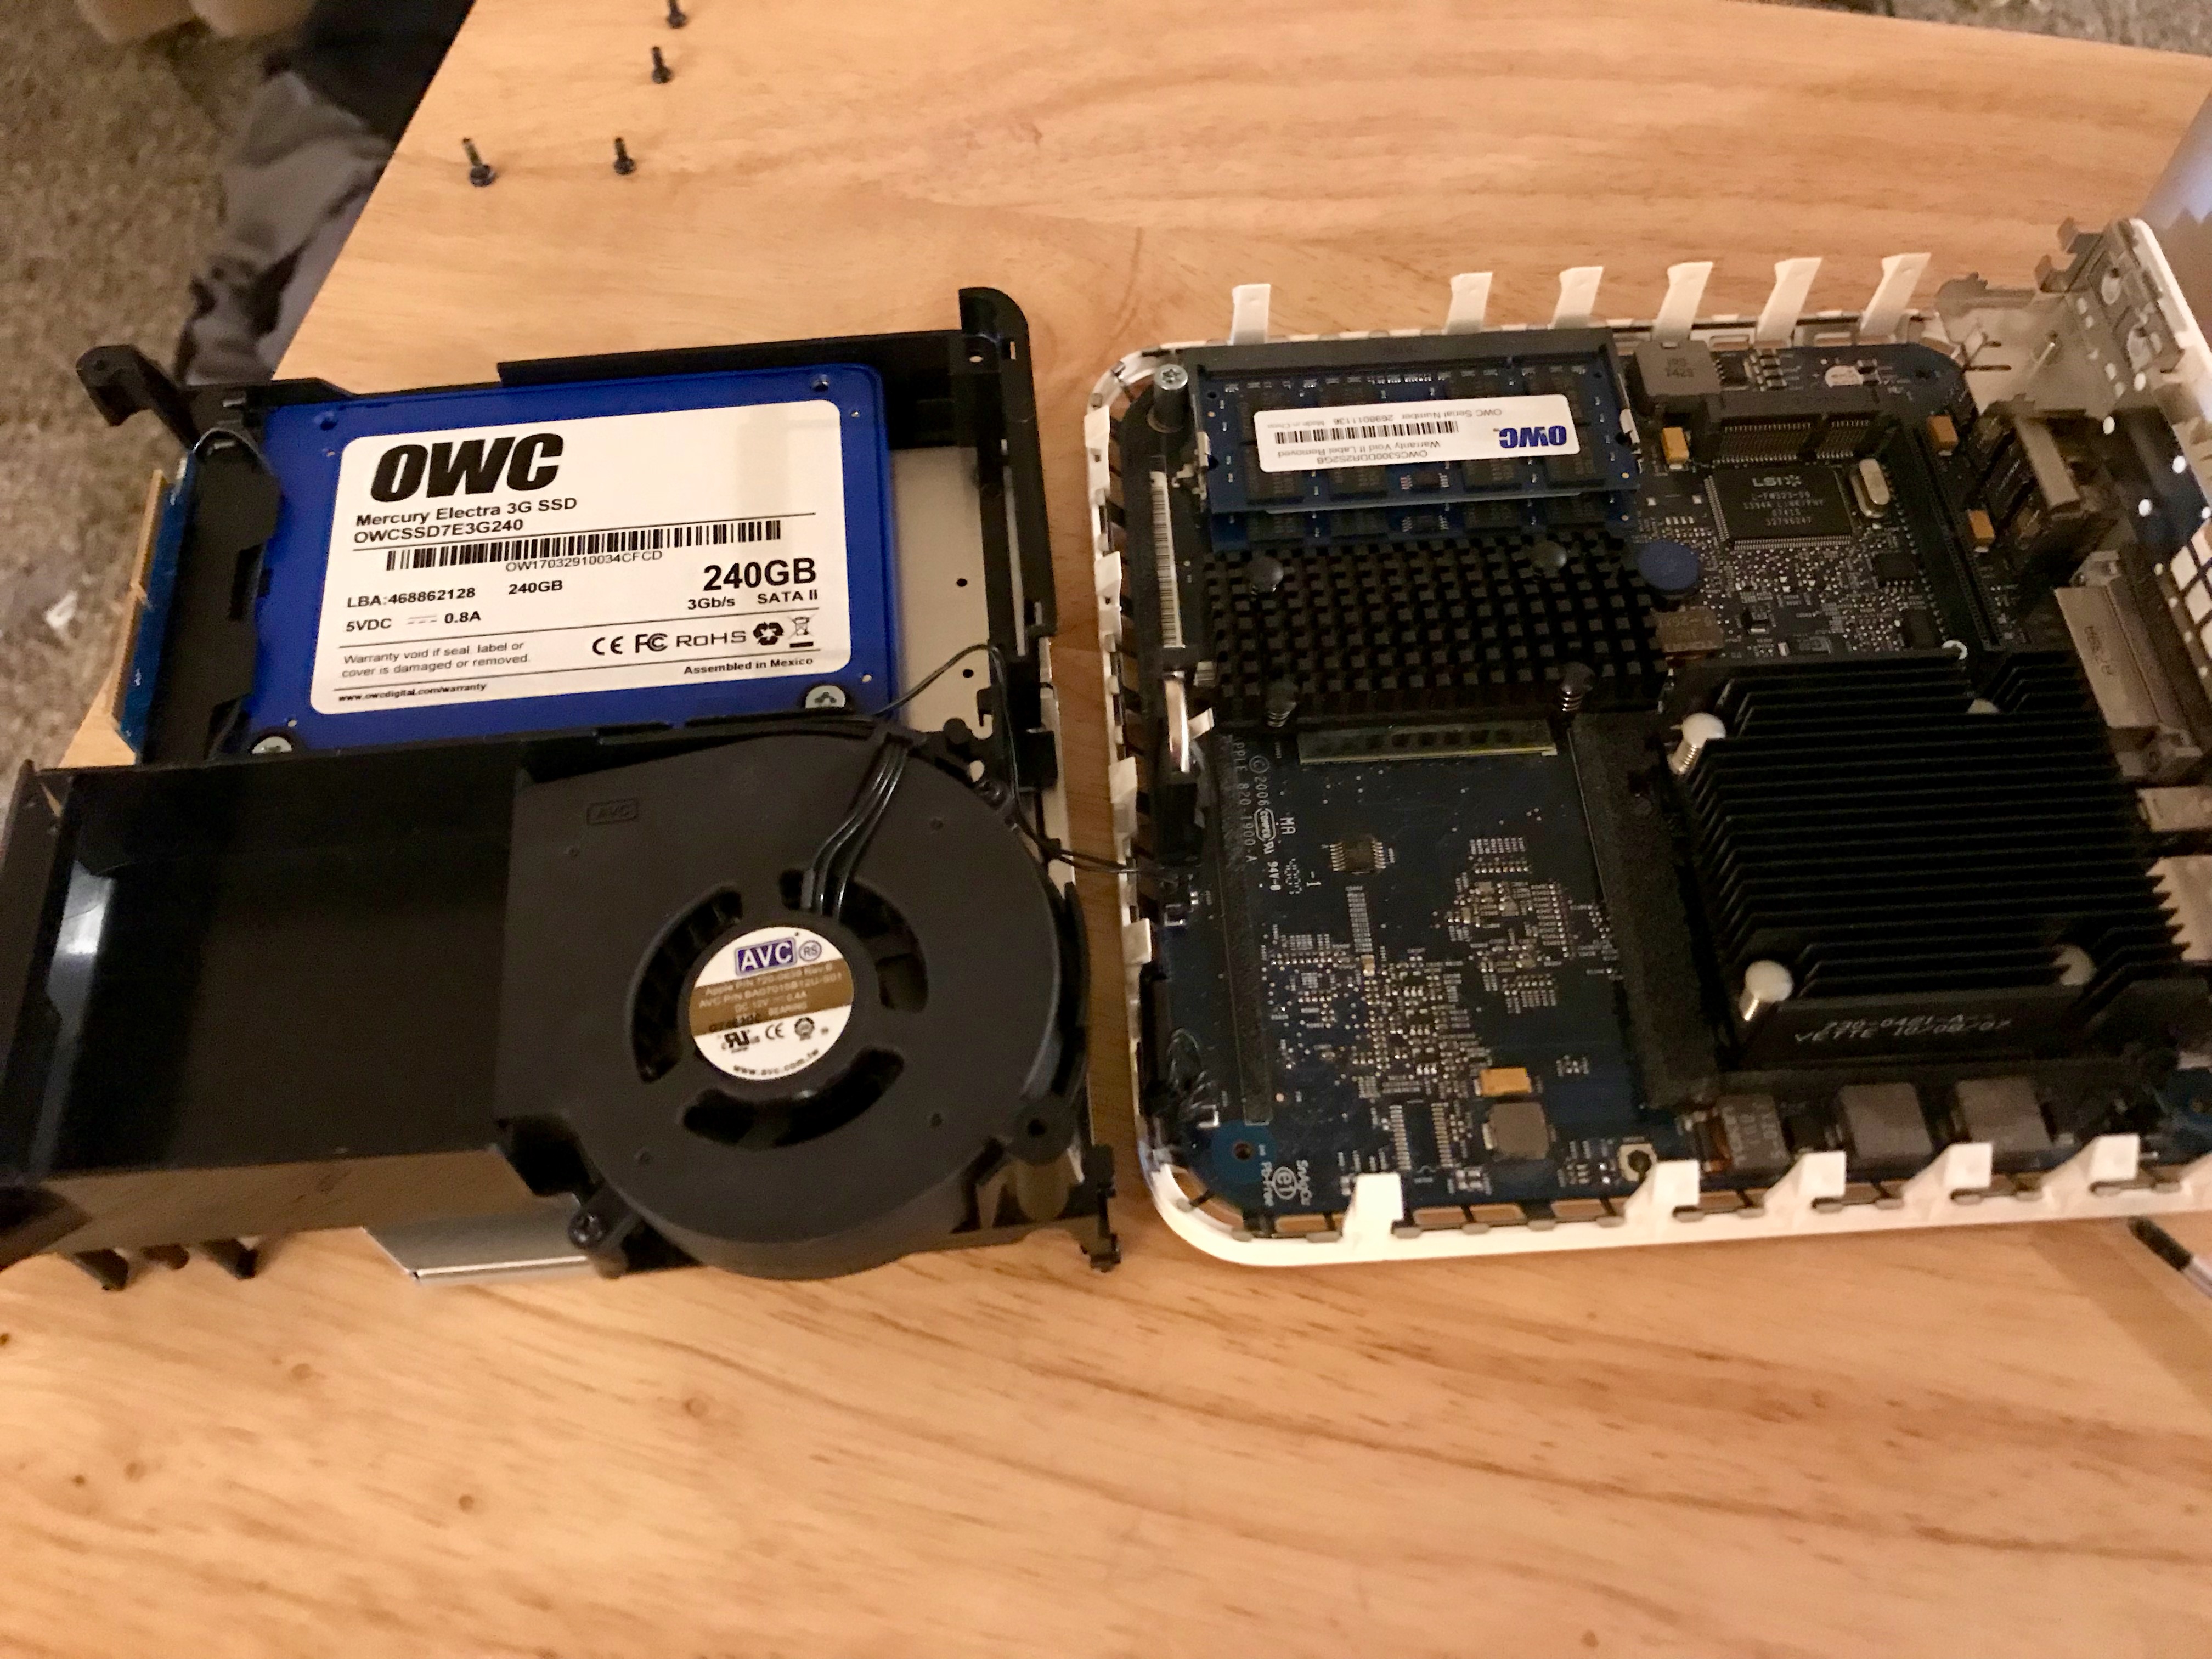
The Mac has been extensively modified. To begin with, many of the components inside have been removed. You can see from the above picture some of the modifications. The sound card, bluetooth card, wireless card, any errant wires, anything that is non-essential was stripped out and thrown away. The server has no ability to communicate wirelessly at this point. The only thing that remains is the IR sensor, but that is strange to me because I removed the actual receiver.
The CPU heatsink was removed, very carefully, and the thermal pad was replaced with Artic Silver thermal compound. The entire system was completely disassembled and meticulously cleaned with 99% Isopropyl alcohol. In addition, the fan was replaced with a new OEM fan to ensure longer survival.
The hard drive of the Mac was originally a 5400rpm Hitachi 160GB SATA drive that was white labeled for Apple specifically. This has been replaced with an OWC Mercury Electra 3G 240GB SSD and the RAM was upgraded with a matched set of OWC PC5300 DDR2 2GB memory modules. While it is likely I could have got the RAM and SSD from pretty much anywhere, I like OWC and their prices, for these upgrades at least, were reasonable.
Peripherals
The only peripheral worth listing in this section is a DVI EDID Dummy Plug which simulates a 1920x1200 monitor being attached to the Mac. Normally I would not bother with an EDID Dummy Plug because the server won’t need to render any graphics for this use case, but in their infinite wisdom Apple decided that this model of Mini should only be able to function as a Personal Computer, and the damn thing won’t load past the EFI unless it detects a monitor.
Other than power, networking, and storage, this is the only peripheral attached to the Mini.
Future Plans
It is possible more upgrades may be done on the Mini in time. The most significant issue preventing any further upgrades is that I cannot seem to get the damn computer to detect a USB drive for a boot option. Should I manage to get it to the point that the system will boot from USB, there are a few additional updates I would make:
- Replace the Internal DVD-ROM Drive with a PATA to SATA converter from iFixit
- Install a 1TB Western Digital RED data drive
- Replace the top cover of the mini with the cover from an A1278 Mini Server
- Possibly max out the CPU to an Intel Core2 T7600.
- Doing literally anything involving the CPU is a tedious endeavor because Apple used one way plastic plugs to mount the heatsink. I was lucky when I was changing the thermal compound, and I do not think I will get lucky again. This means that I would need to use nylon bolts to remount the HS and that solution isn’t particularly elegant to me.
Storage
Drive
Right now storage is provided by a single external drive. The drive is a G-Drive 4TB USB-C external drive, which internally is just a white labeled Western Digital 4TB RED drive. I bought the USB-C model even though the Mini only has USB 2.0 Ports because based on some preliminary research, USB-3 drives on USB-2 ports are still faster than USB-2 drives on USB-2 ports. Additionally, should I ever upgrade the server, the drive will just get faster instead of slower. Additionally, the USB-C port is just more elegant than the way they added USB3 onto existing USB2-B connections. I just like the look of them more. I understand that that is trivial, but that’s just the way it is.
Cable
While I am sure that the standard cable would have been more than sufficient, I have this weird thing about using manufacturer provided cables, even from a reputable manufacturer. To this end, I replaced the original cable with an Anker PowerLine+ USBC to USBA. It’s red, it’s pretty, and it has a pretty decent warranty on it.
Improvements
Honestly the biggest improvement that could be made would be swapping the server for something much more powerful. Right now I am looking at second hand Mac Pro towers, with Xeon processors and ECC Ram. Once I purchase one, it is likely that I would max it out and do some internal modifications to it before switching it out with the current Mini.
Beyond that obvious one though, other upgrades could be made as noted in the server section. The most realistic one that could happen relatively soon is the addition of a second external drive. This drive would allow for dedicated drives for each part of the data process, or more likely, mirrored drives to increase performance. That being said, the USB-2 connection isn’t actually the bottleneck in the system at this time. That discussion, however, will take place during Stage One.
Security Considerations
The biggest thing that could be done with respect to increasing security is the addition of a Hardware Security Module. Currently I am considering implementing the [NitroKey HSM][21] due to its reasonable price, open nature, and multiple interesting features. All of this is secondary, however, to the far more likely progression of upgrading the entire server with a new one. Once that is done, then it is reasonable that we may focus on security.
That said, it is possible that I will be unable to find a reasonable deal on secondhand towers, and in that case I may, instead, choose to continue working with this little Mini.
Conclusion
This concludes the first stage, or rather, the zeroth stage, of the backup project. We itemized the various components that form the foundation for the software aspects of this project, iterated over potential improvements, and listed security features that could be implemented at a later date. After this, we move on to Stage 1 where we talk about the chosen operating system and how to make it more secure for it’s use as a hosting environment.