28 Nov 2018
As many people may have guessed, this backup system very quickly got much larger
than I initially expected. Because of the size of the backup project, the number
of people interested, and how quickly things are changing along the way, I’ve
decided to approach this project in a new way.
In the sidebar to the left you will notice there is a new link to a “Projects”
directory. Here you will be able to find all my larger works. The project is
now called ThothBackup, and what follows is a list of things I have learned
along the way. All of this data will be consolidated and entered in a more
coherent fashion into the project pages, so keep an eye out for those to update.
But for now, we have a lot of ground to cover, so let’s get to work.
One of the biggest parts of the backup project was its ability to be
cross-platform. I want the system to be easy enough to use that anyone and
everyone could grab a client, get it configured, and get going. To facilitate
this, the initial idea was to use tools that were built into the operating
system. On Linux and macOS this is easy enough, as rsync is installed on most
distributions by default, and if it isn’t installed it is just a quick package
manager installation away.
Then however, entered Windows. Initially I assumed that it would be easy to use
with windows as well. After all, rsync.net has a nice little guide
explaining how to set it up. However, their client can detect when you’re not
using rsync.net servers (which is totally fair, there’s no hate from me on that)
and limits using the program to 30 days. The other alternative is cwRsync, which
was initially freeware, but has since changed to being a paid product. Obviously
asking someone to play for a program to even be able to start to use the backup
isn’t a great selling point.
The first idea that I had was to write something on my own. Maybe have shell
scripts on all platforms check for required code and fetch anything that is
needed. However, shell scripts are hard for many people to debug, and the sight
of a command prompt can strike fear into the hearts of many windows users.
The second iteration of the idea was to write something in Python. However at
that point the client is becoming a software project in its own right, and I
didn’t start this to develop software, I started it because I wanted to set up
a neat little backup service for my friends and family.
Thankfully, there are many other software suites that are both cross platform
and useful for this task. We ended up going with SyncThing. SyncThing is
an open-source (MPL2, which is a permissive form of copyleft) synchronization
library that is cross-platform and written in Go. I’m a huge fan of Go even
though I don’t actually write it myself, as it is a fantastic language for
exactly this type of thing. Even better, SyncThing comes with easy to use and
easy to understand GUIs, and is capable of NAT and Firewall punching via relays,
and makes device configuration dependent on acceptance from both the server
and the client. The protocol it uses is open source, and based on the usage
reports at least one person is using it on 30 million files with 2,000 peers.
Last, but most certainly not least, traffic is encrypted with 128 bit AES,
and the protocol maintains perfect forward secrecy.
All of this (and a whole lot more, it really is an awesome bit of software)
makes SyncThing perfect for our use case. This may not always remain the case,
but it gives me somewhere to start. Even if we end up moving beyond SyncThing in
the future, you really should give it a look. It is a phenomenal piece of
software.
Part 2 - Changes in Sync Methods
As hinted above, the original plan to synchronize systems wasn’t going to work
without more work than I was willing to put in to a single component of the
system. Once we threw out the initial way the system was supposed to work, we
had to retool the way things worked on the operating system too.
The original way the sync process was meant to work was that every user’s
operating system would get its own Server Account, and rsync or some other
synchronization system would be tunneled through SSH. I wasn’t sure if
authentication would be handled by system accounts or LDAP, because I never got
that far. But I did specifically pick the operating system (OpenSUSE) because
of that distribution’s system configuration manager (YaST).
Now with the use of SyncThing, a daemon process would run under a single user,
and all clients would then connect to that daemon process which would then
write to disk using that daemon’s permission set. Thus, no need to worry about
ACLs or anything of the like. It was interesting to work with ACLs though. You
can see some of my old code if you browse through the commits history of the
ThothBackup GitHub repository.
Part 3 - Filesystem Considerations
When I was testing the original synchronization strategy, I had everything being
deposited onto BTRFS subvolumes that were mounted with the compress option. To
be entirely honest, I wasn’t that impressed with the way the compression was
working.
In the new system, BTRFS subvolumes are still being used (User, System Name,
Operating System, Drive Name, Backup Client, Archive Client, etc) except now
the subvolumes are mounted with compress-force option. Additionally, I have
learned about out-of-band BTRFS deduplication and plan to play around with that
at this stage in the project as well.
Part 4 - Operating Systems
I really, really like OpenSUSE. Like, a whole whole lot. It may very well be my
favorite binary distribution, and I’ve used quite a few. I think the whole way
it works is simply phenomenal, I like the company behind it, and it honestly
boils down to just that: I like it.
But, after all the changes above I began to consider if I shouldn’t change
distributions. Originally I thought of changing to BSD, but I was concerned
about software availability. I know FreeBSD tends to have a very well maintained
ports collection, but I was still.. concerned. Most tools in this arena seem to
cater toward Linux, and if I was already changing multiple systems to avoid
having to write new software, did I really want to run the risk of needing to
write server side software?
After much deliberation, I ended up settling on Debian Stable with backports.
The initial installation is extremely lean, and there is a truly massive amount
of documentation available for Debian. It paid off well too. The initial install
of Debian stable clocked in at 60MB of ram used, where as OpenSUSE was running
around 200MB after reboot.
Conclusion #### {: #thoth-1-conclusion }
There is honestly still quite a bit more that needs to be discussed. One of the
most amusing things that the past week or so has taught me is that Sydney’s
computer is as good of a backup test as a normal single family household. His
System has 4 drives, over one million files, a quarter of a million directories,
and about a terabyte of used storage on it. Combining his single computer
with my mac and a windows virtual machine, and we have as much testing as we
could need.
Notes #### {: #thoth-1-notes }
I’m going to start including a little section at the bottom of each post to
remind me what I need to work on. Hopefully having this publicly viewable will
encourage me to actually follow through on writing more than one blog post every
18 days.
- stage 1 project page
- stage 2 project page
- talk about security improvements that can be done
- rewrite the server side new client script
- talk about specific SyncThing configuration options used
- write utility script to keep server config files up to date in git
10 Nov 2018
Introduction ## {: #yet-another-introduction }
I’ve been wanting to get back into blogging, or at least writing more
consistently, and I’ve also been looking for projects to work on. One of my
favorite things to do, oddly enough, is to work on systems that will manage
large amounts of data. So, I’ve decided to start a new project.
This is the first in a series of posts detailing the creation of a multi-tiered
backup system for me, some of my friends, and potentially (but not likely)
others as well. I will warn people ahead of time that I’m not building any
hardware that could be called “resilient,” instead I’m using things that I
already have around the house, plus a few extra cheap purchases, and a lot
of software to make things work.
Speaking of software, almost everything used will be cross-platform and open
source. I will likely be writing a lot of “glue,” in the form of shell scripts
or potentially even some ruby. I will also be trying to focus on keeping things
secure on untrusted servers, and secure in transit, to sometimes ridiculous
levels. That being said, this is NOT a zero-knowledge system. Since it is
for me, family, and friends, they are made aware of this ahead of time. In time,
it is possible that this setup will grow and evolve to make a zero-knowledge
system that functions similarly to this initial design idea, but that’s far
down the line.
None of these blog posts will likely be as refined as my Icinga2 tutorials. One
of the things I am trying to do is just get myself into the habit of documenting
my projects. If I keep having to revise, edit, and source, I’ll eventually give
up. So if there is anything you are interested in learning more about, Google
will likely be your best friend.
Essentially, these are meant to explain how I built the system, and why I did
what I did. Sometimes that may be as simple as “because I like them more” and
other times it may have to do with more in depth research.
Environment
The server will exist in an environment with a battery backup system provided
for the server, any data drives, and the core router that the server will be
connected to. Connection to the internet is provided with a 100mbps symmetrical
fiber connection that can be upgraded instantly to 1Gbps symmetrical if needed.
Connections between the server and the fiber node is provided via CAT-7A
cabling. Routing is handled by a Ubiquiti EdgeRouter Lite, with 3gbps line rate
and one million packet per second routing. IPv6 and IPv4 are supported.
Eventually the router will be able to provide routes both to the public internet
and to the dn42 darknet and Tor services.
Hardware
The hardware isn’t exactly great, but it is the best that can be done at this
time. The server consists of a Mac Mini Model 2,1 made circa early 2007. It
contains a dual core Intel Core2 Duo processor running at 2.0 GHz.
/proc/cpuinfo is provided here:
processor       : 0
vendor_id       : GenuineIntel
cpu family      : 6
model           : 15
model name      : Intel(R) Core(TM)2 CPU         T7200  @ 2.00GHz
stepping        : 6
microcode       : 0xd1
cpu MHz         : 2000.000
cache size      : 4096 KB
physical id     : 0
siblings        : 2
core id         : 0
cpu cores       : 2
apicid          : 0
initial apicid  : 0
fpu             : yes
fpu_exception   : yes
cpuid level     : 10
wp              : yes
flags           : fpu vme de pse tsc msr pae mce cx8 apic sep mtrr pge mca cmov pat pse36 clflush dts acpi mmx fxsr sse sse2 ss ht tm pbe syscall nx lm constant_tsc arch_perfmon
pebs bts rep_good nopl cpuid aperfmperf pni dtes64 monitor ds_cpl vmx est tm2 ssse3 cx16 xtpr pdcm lahf_lm pti tpr_shadow dtherm
bugs            : cpu_meltdown spectre_v1 spectre_v2 spec_store_bypass l1tf
bogomips        : 3999.68
clflush size    : 64
cache_alignment : 64
address sizes   : 36 bits physical, 48 bits virtual
power management:

processor       : 1
vendor_id       : GenuineIntel
cpu family      : 6
model           : 15
model name      : Intel(R) Core(TM)2 CPU         T7200  @ 2.00GHz
stepping        : 6
microcode       : 0xd1
cpu MHz         : 1000.000
cache size      : 4096 KB
physical id     : 0
siblings        : 2
core id         : 1
cpu cores       : 2
apicid          : 1
initial apicid  : 1
fpu             : yes
fpu_exception   : yes
cpuid level     : 10
wp              : yes
flags           : fpu vme de pse tsc msr pae mce cx8 apic sep mtrr pge mca cmov pat pse36 clflush dts acpi mmx fxsr sse sse2 ss ht tm pbe syscall nx lm constant_tsc arch_perfmon
pebs bts rep_good nopl cpuid aperfmperf pni dtes64 monitor ds_cpl vmx est tm2 ssse3 cx16 xtpr pdcm lahf_lm pti tpr_shadow dtherm
bugs            : cpu_meltdown spectre_v1 spectre_v2 spec_store_bypass l1tf
bogomips        : 3999.68
clflush size    : 64
cache_alignment : 64
address sizes   : 36 bits physical, 48 bits virtual
power management:
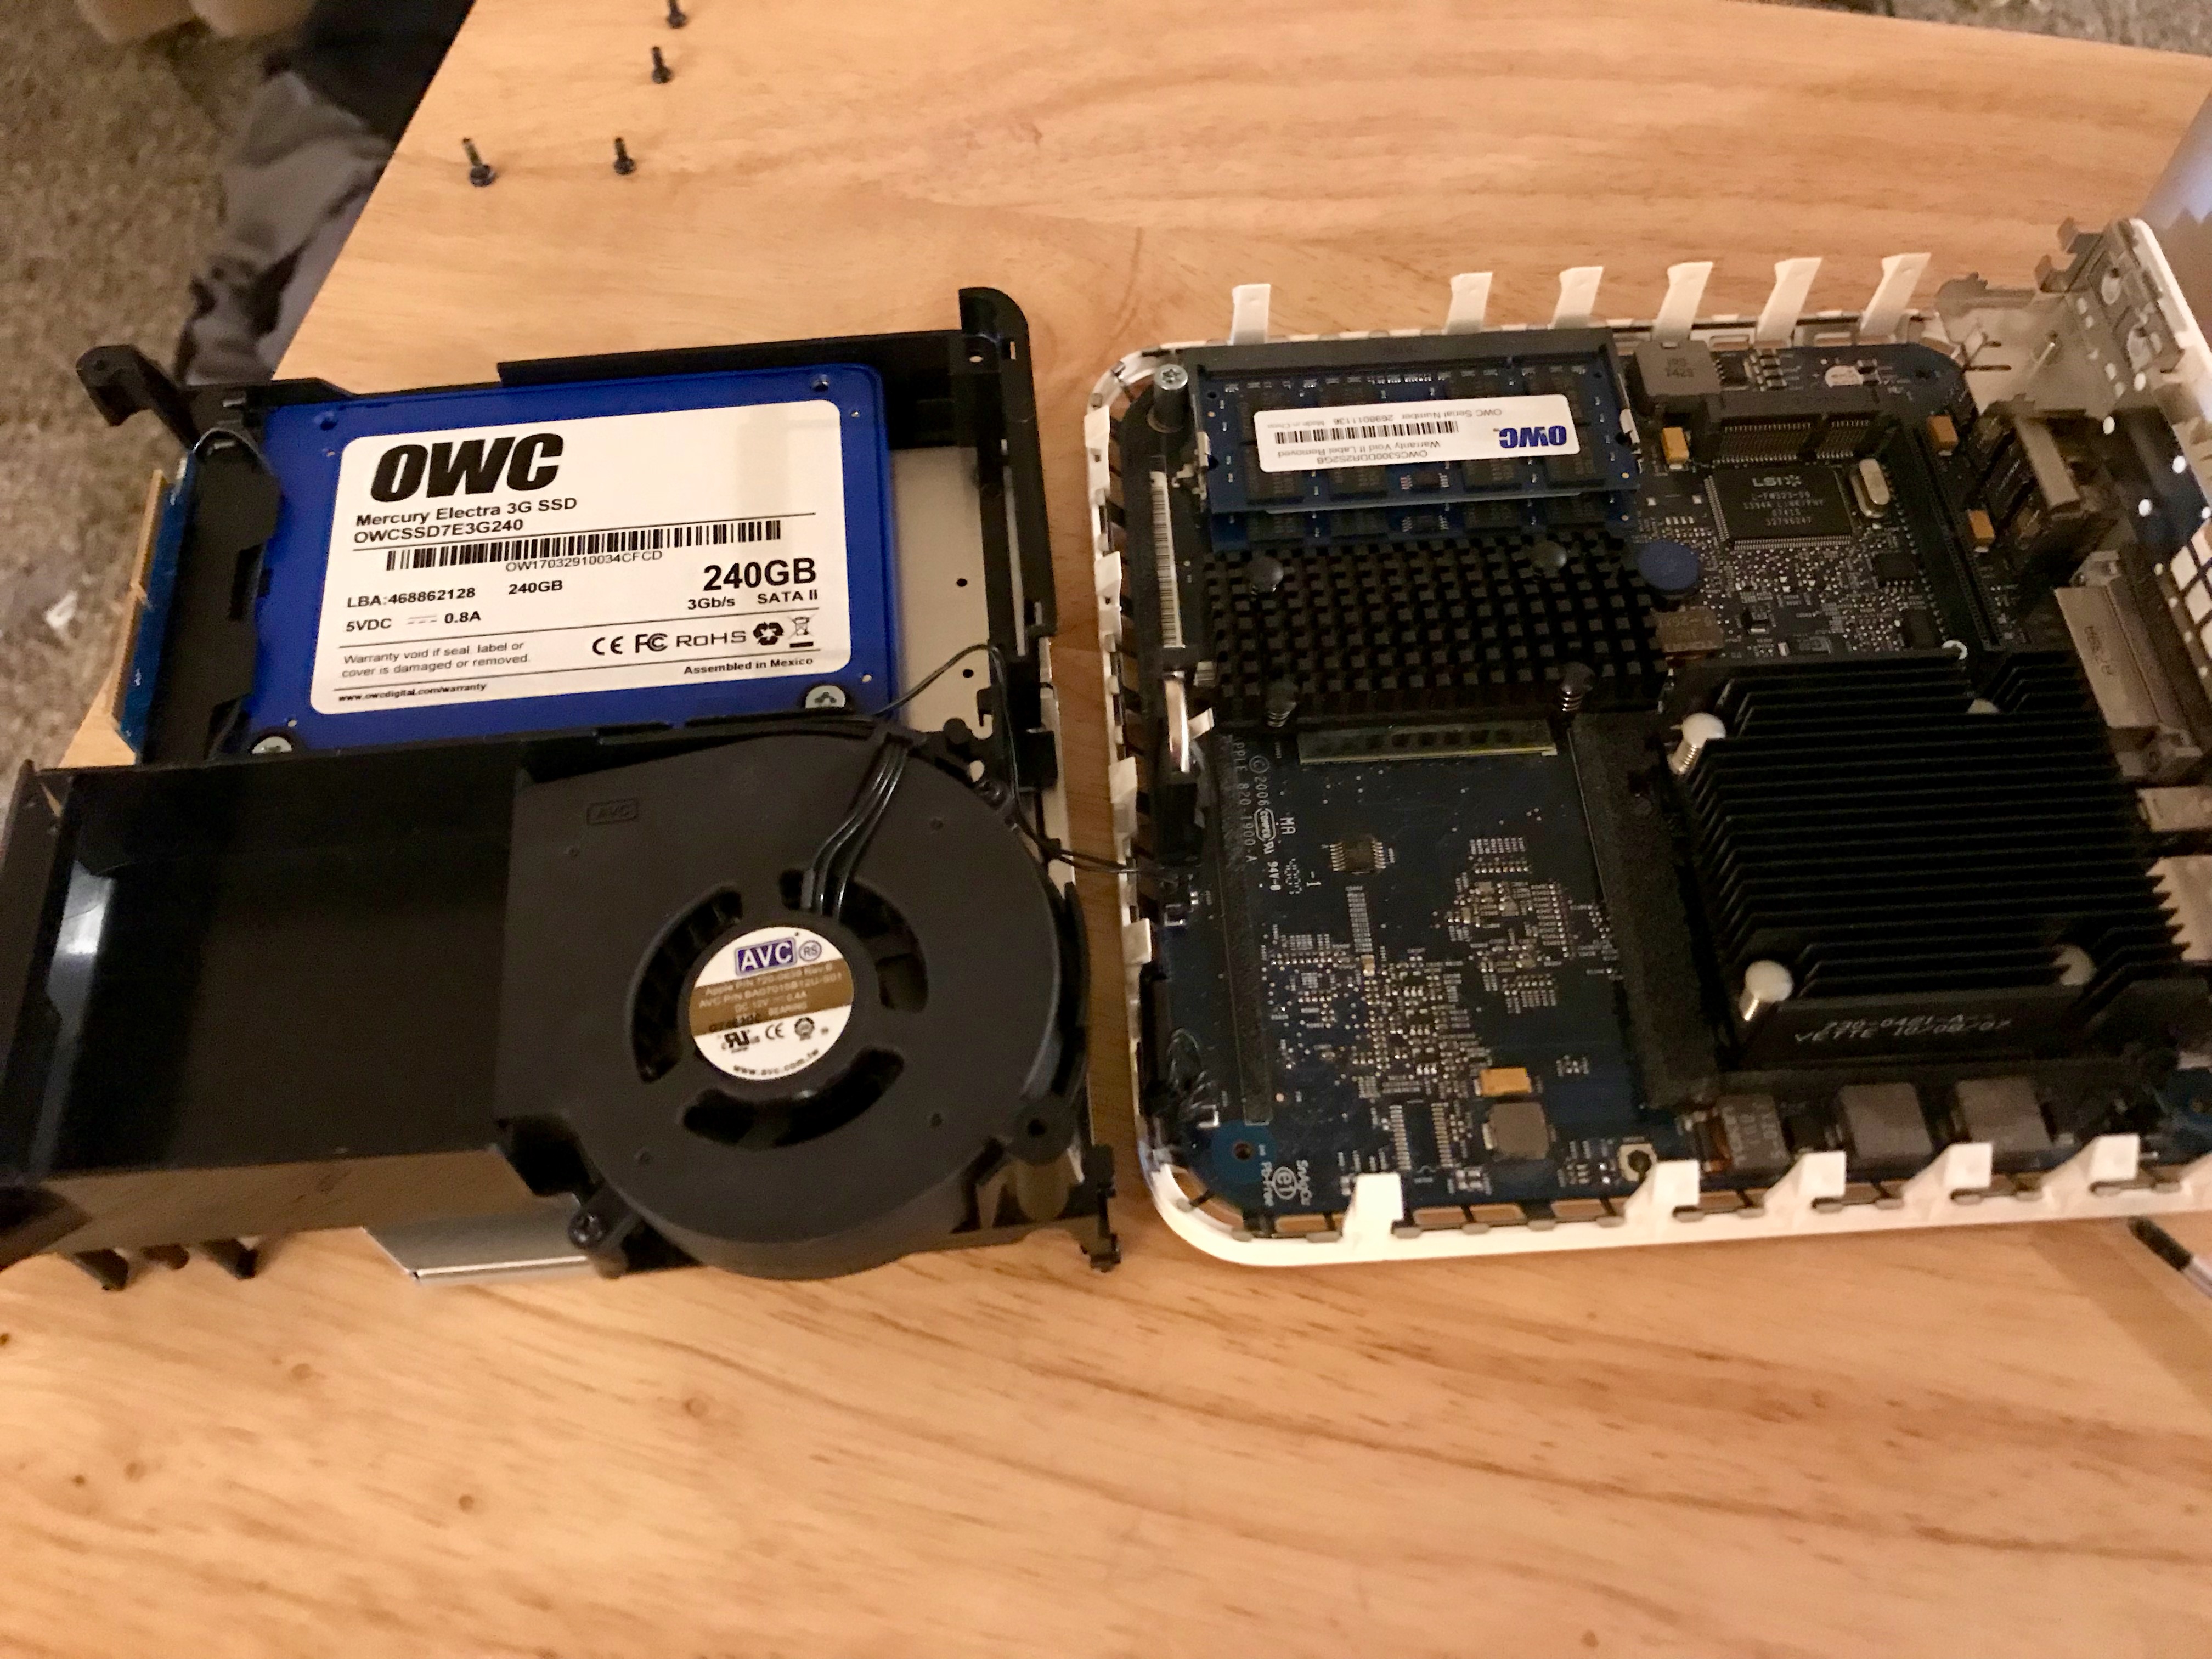
The server has been modified substansially from it’s factory state. The sound
card has been removed, as has the WiFi card and Bluetooth card. IR functionality
has been disconnected. Any extraneous wires have been removed. The original
160GB Hitachi hard drive has been replaced with a 240GB solid state drive from
OWC. The ram has been maxed out with 4GBs, again provided from OWC. The system
is not capable of addressing all 4GB despite being a 64-bit system due to
limitations imposed in the EFI. The CMOS battery was replaced, and the processor
was unseated, cleaned, and thermal material replaced. The fan was also replaced
to head off any potential issues caused by old age. You can see a picture of the
internals of the system below.
The system is connected to the router with a Fluke-Certified CAT-7A S/FTP dual
shielded cable. The interface it is connected to supports a 1Gbps full-duplex
connection.
The primary data disk is a G-Disk USB-C 4TB external drive. This drive utilizes
a white label Western Digital Red WD40EFRX. It is connected to the Mac Mini via
an Anker PowerLine+ USB-C to USB-A nylon cable.
The older Mac Mini’s would refuse to boot if the system could not detect that a
monitor was connected to the system. Apple claims that this is because the Mac
Mini was intended to be a true personal computer, which would generally prohibit
the system’s operation without a display device. Strangely, no such detection is
present to test for either a keyboard or a mouse.
To bypass this issue, a DVI Dummy Plug is installed in the Mini’s DVI port. This
plug uses EDID to tell the system that a 1920x1200 capable display is connected.
This has also been reported to be useful in accelerating VNC Remote
Administration, however no GUI is present on the system.
Operating System
The operating system used on the server is OpenSUSE Leap 15 x64. You may
remember that I mentioned above that the EFI used on the system is 32-bits.
This limitation is bypassed by formatting the internal server drive to utilize
a legacy MBR partition table. From this, GRUB2 loads in legacy mode, which is
32-bits. This provides the shim that allows the 32-bit system firmware to load
a 64-bit operating system. Over 72 hours of stress testing revealed no
instability with the operating system booted via this method.
OpenSUSE was installed using the Server profile. Originally the
Transactional-Server profile was used, however the early morning reboots
could cause issues, and the installation did not seem to play well with LVM.
Hardware Stress Testing
The internal solid state drive was tested via an OpenSUSE Live distribution. The
computer was first suspended and resumed to bypass the system’s EFI’s proclivity
for freezing the internal drive’s security interface. Once the interface was
unlocked, smartctl was used to trigger the drives internal SMART short test,
conveyance test, and extended test, in that order. All results were nominal.
The internal drive was then wiped via hdparm by sending an ATA Enhanced Secure
Erase Command with a non-null password.
A quick installation of OpenSUSE Leap 15 was then performed.
The hardware was then tested from inside the new installation utilizing the
Stress-NG test suite for over 24 hours. During this time, four virtual memory
test workers iterated over 100% of the available memory to force swapping as
well as check for ram errors. Two CPU test workers were ran on the aggressive
settings, and an IO worker was deployed to check the SSD interface. All systems
passed the stress test perfectly, with benchmarks appropriate for a system from
2007.
The external drive was then connected to the system. A battery of tests were
performed. First, the drive was tested via smartctl. As the drive is connected
via USB, the -d sat,16 option was passed to allow communication directly with
the USB-SATA bridge. The drive was tested out of the box using the SMART short
self test, conveyance test, and extended self test. This first round of testing
took 10 hours to execute. After the inital round of tests, the SMART attributes
table and its corresponding values was recorded.
Then the badblocks command was ran to write to and read from every sector on
the drive. The full command was
badblocks -wsv -t random -b 4096 -c 4096 -p 4 -o /root/sdb.log /dev/sdb. This
performed four read-write-verify passes. Each pass took approximately 50 hours
to complete.
Once the badblocks battery was complete, smartctl was once again used to
run the same testing sequence of short, conveyance, and extended self tests. The
attribute table was once again dumped, it’s values recorded, and the values then
compared to those from the table dumped prior to running badblocks.
As these tests are actually still in progress, the results are not yet
definitive.
Conclusion ## {: #yet-another-conclusion }
This first post simply outlines the primary variables in this project. Hardware,
operating system, and environment should all be assumed to remain static for
the remaining project entries. Should anything change, I will likely update this
entry versus notating it in the respective entry where the change was made. It
will be made clear that this entry has been edited, should that come to pass.
Extensive testing was performed to detect any chance of infant-mortality in the
hardware. I have previously had negative experiences utilizing hardware right
out of the box.
14 Oct 2016
The following post is an extreme rough draft. In fact, it isn’t even actually a
post. These are my development notes from my refactoring of the collegi data
infrastructure. As such, they’re arranged in no real sensible order besides
having been written chronologically. Additionally, these have not been
proofread, grammar checked, copyedited, or spell checked, as i write them in an
IDE and not an actual text editor. As such, please don’t judge my writing
ability off of them. More importantly, however, these do not have the
standardized links that i provide to new concepts or commands in my blog posts,
as embedding links to things I already know or have access to in a developer log
that on average no one else sees just seems silly.
So, if you have questions, use google, and expect these to be updated over time.
The logs as of this posting run from 10/13/2016 to 10/16/2016, so over three
days of work. There is a -LOT- more to be done.
They are broken down into the following format. Each list is a set of specific
actions I took, and sometimes the list ends up with notes in it because, again,
no one generally sees these, but under the task list is the space reserved for
notes on the above list. Then a new task list is declared, then notes, then
tasks, and so on and so forth. Generally each new task heading would signify
a new blog post, talking about the tasks and the notes, so keep that in mind.
These were requested by Kan, a player on our server. Enjoy!
Tasks
- Made a backup of the repository as it stood on 2016-10-13 in the event
anything breaks too badly during this.
- Removed all existing submodules from the
git repository. Committed the
removal.
- Ran the previous backup script to make sure that 10/13 was backed up. This
included new additions to git annex.
- Forced git annex to drop the old SHA256E key-value backend files that were
made obsolete by the conversion to SHA512E key-value backend.
Notes 1: During this time, and while watching the way the version 1.0
backup script ran, I noticed there is a significant performance penalty for
moving the location of the local mirror. Borg uses the entire path as the file
name, so any deviation in the path spec causes it to treat the files as brand
new. Note that this does not cause any issues with de-duplication, but the
process of adding these files causes a massive performance hit. This made me
start thinking about including the local mirror in the git annex so that as
long as the annex was kept in tact in regards to metadata, the paths would
remain the same as all additions to Borg would take place from the same root
directory.
The problem with this would be the fact that annex keeps everything as
symlinks. As such, I am looking into the unlock feature of version six
repositories.
Notes 2: Dropping unused from a local area goes -much- faster than
dropping from remote. Who knew, right? :tongue:
Tasks
git-Annex drop completed, but Finder isn’t showing a reduction in used drive
space, but I think this is more an error on the side of finder than something
with git annex, as du -h showed the directory was down to the size it should
have been. Once I manage to get this finder thing figured out, I’ll move on to
the next part.- Finder is taking too bloody long to figure its shit out, so I moved on to the
next step in cleaning up the repository. I’m rewriting the commit history
to completely remove files I don’t need from the actual
git repo. In theory
this shouldn’t touch git-annex at all, but that remains to be seen.
- Ran BFG Repo Cleaner on the following directories and files:
- collegi.web
- collegi.pack
- collegi.git
- .DS_Store
- .gitmodules
- collegi.logs (Just for a moment, and we made backups.)
- collegi.configs
- Ran filter branch to purge any empty commits left after the above.
- Expired original ref-logs, repacked archive.
Notes 3: At this point we had gone from 230 commits to 102 commits. We were
also left with the original envisioning of what this repo would be, which was
a simple git annex to push files to Backblaze b2 from the Borg repository. Now
to verify that all of our data is still 100% ok.
Tasks
- Ran
git fsck
- Ran
git annex fsck
Notes 4: Wow this is going to take a long fucking time. Who woulda thunk
it.
Notes 5: So apparently the current version of git-annex is using the old
mixed hashing method, which is a format that “we would like to stop using”
according to the wiki. Might need to migrate. Need to figure out how.
Notes 6: From the wiki: “Initial benchmarks suggest that going from xX/yY/KEY/OBJ to xX/yY/OBJ directories would improve speed 3x.” It’s worth
migrating.
Tasks
- Run
git annex uninit
- Reading through the
git-annex-init man page to see what else we should
change now since we’re already migrating. Post Uninit we’re going to have to
run a full borg data consistancy check.
Notes 7: Ugh. The document I found was actually an theoretical one, and
while it is true that git-annex does use the new hashing format in bare
repositories there is no actual way to move to the new one in a regular repo.
So I am running an uninit for basically no reason. The only good thing about
this that I can think of is that I will be able to reform the final git-annex
repo in a much saner fashion. The bad news is that I have lost the log files,
unless git-annex is going to bring those back for me. I am annoyed.
Notes 8: Good news! I just remembered that I had made a rsynced backup
of the repository before I started fucking with it. So I didn’t actually lose
the log files, I just went ahead and pulled them out of the git-annex
backup.
Tasks
- After the git annex had uninitialized, I decided that if I was going to do
this whole damn thing over again I was going to do it right.
- Started a new
borg repository in new-collegi. Pulled out contents from the
original borg repository, using backups to restore any files that got hit in
the above clusterfuck, then recompressed with maximum LZMA compression.
- During this period I also standardized how the
borg create paths would work.
The server would exist within a collegi.mirror directory, and the entire
directory would be added to borg upon each run of the backup script. This
effectively means we never have to worry about the LZMA penalty discussed below
again after the first re-add, unless we do major server restructuring, because
paths will remain stable between commits.
Notes 9: The initial speed penalty for using LZMA is absolutely jaw
dropping. One borg create took eight hours to complete. Eight. However, I
quickly noticed that due to Borg’s de-duplication mechanism, the add times got
faster the more data I added, and gzip-9 to lzma-9 did actually yield some
improvement. It also reduces the incentive for me to do this fucking disaster
again, because of how much it absolutely fucking sucks.
Notes 10: As an example of what I mean by the above, the initial adding of
1.8.9 took six hours with LZMA-9. When the map was changed from NewSeed over to
Collegi, it took another four hours just to update the paths and what not, even
though the data hadn’t updated, just the paths have changed. (This is indicated
by the fact that the total repository size barely increased, all the size that
changed could be explained by new metadata.) However, when the paths are kept
the same, adding 100GB of data takes 13 to 15 minutes. So, the benefit of
LZMA-9 is worth the initial startup, imho.
Notes 11: borg extracting from the GZIP-9 archives takes about 40
minutes, and that’s from highly de-duplicated and GZIP-9 archives. What this
means is that pulling from an lzma-9 is probably going to take about an hour,
depending on just how de-duplicated the archive is (as in, how many different
chunk files contain parts needed to reassemble the original content).
Notes 12: Have hit the series of backups where things have moved into the
Users path, and I’m restructuring them. It made me think about how I will handle
the mirror directory in the future. I think I am going to do a few new things
with respect to the new setup. The mirror directory will be a part of the
git-annex repository, so there will be a new folder inside it called
collegi.mirror or something similar, and then I can move the new backup
script to be ran from the root directory, which will be beneficial. That way
everything is neatly packaged. the issue becomes mirroring this, because
uploading that much constantly changing data to backblaze would be literally
stupid, and not at all within our budget. What I will likely do is initialize
a “bare repository” on my time machine drive, and mirror the entirity of the
git-annex repository to that.
Mandatory Break Notes
- You need to run borg info to make sure the latest creation thingy is the
proper size, and a borg check might not be a bad idea either as you fell asleep
and closed the mac during work on the repo.
- Cleaned the time machine volume of the repeated backups of the new repository
because it doesn’t make any sense to have 20 versions of it.
- Moved the repo to the time machine drive as temporary storage using rsync.
Tasks
- Restarted the transfer process starting on the 8th of October
Notes 13: Not a huge shock but running some of these commands across USB
2.0 can add anywhere from 10 to 30 minutes. Doing them cross device gets even
worse, with some transactions taking almost an hour.
Notes 14: I’ve been going back and forth on what filesystem I would like
to deploy since I am redoing the collegi drive as a whole. Now the interesting
thing to note here is that by the time I get this thing fully ready to deploy,
the drive I have here may not be the drive it ends up on, but this is as good
of a testbed as any. I’m really thinking I will go with apfs. Most of the
gripes I have with it are easily resolved through borg and git annex.
Notes 15: In a highly amusing turn of events, it is bigger in lzma 9 than
it was with gzip 9. weird.
Notes 16: While it would likely be prudent to go back to the previous
compression method, the benefits that I have made to the directory structure
while redoing the borg repository are worth the few extra gigabytes of overhead
especially concerning with Backblaze B2 it barely costs a penny.
Tasks
- Use JHFSX for the new drive. I would have really liked to use APFS but I am
still worried about the data loss considering there is almost a year till it
will ship. JHFSX is reasonable enough for right now, while still being safe to
unplug.
- I went round and round on using encryption on the new drive. did it.
- using rsync to bring the data to its final resting location.
- OK started setting things up
- Defined gitlab as the metadata backup again
- created a bare repository on skaia
- set up prefered content so skaia requires everything in the main repo
- set the main repo to require a –force to drop content via preferred content
- Set the backend to SHA512E
- began the long process of adding the data to the git-annex
- Set up bin directory to not be tracked by git-annex but instead by git
- added backblaze remote, not encrypted, with a proper prefix
- started to sync to backblaze
- noticed an issue with how the sync was going to gitlab, will correct.
13 Oct 2016
What was originally intended to be a one off blog post may become my new source
of material for the coming weeks. After utilizing BorgBackup and
git-annex to backup what has now grown to almost 2.5 Terabytes of
data, I began to wonder what other ways I could put git-annex to use for us here
at Collegi. We already use various GitLab repositories to manage
different facets of the project, and I began to wonder if there wouldn’t be some
way to use git-annex to completely unify those repositories and distribute their
information as needed.
This started as a brief foray into git submodules which, while allowing me
to consolidate data locally, does nothing in helping me to properly
redistribute that data to various locations. The only way that it would be
possible to do such a thing would be to take all the various git repositories
that Collegi utilizes, which currently is sitting at six total, including
the git-annex metadata repository (which isn’t publicly visible), and merge them
into one master repository through the use of git subtrees. This would
allow me to still have multiple repositories for ease of project management, but
all those repositories would be pulled down, daily, to a local “master”
git-annex repository and merged into it.
Once this was done, the use of git annex’s preferred content system would
allow me to decide what data needed to be sent to which remote. This would let
me back up some information to one remote, and other information to another.
As an added bonus, the use of git subtrees would even allow me to push changes
back upstream, and all of it would be centralized.
In the future, this would allow us to push very specific data to specific team
members, who would then modify the data, which would be pulled back down on the
next git-annex sync, we would see changes needing to be pushed upstream had been
made, unlock those files, then use git subtree to push them back to their
remotes. That’s the theory at least. As far as I am aware, either no one has
done this before, no one who has done this before has lived to tell the tale, or
no one who has done this before has blogged about their experiences in doing so.
That’s where this blog comes in. I’m currently in the process of making a
complete copy of the current root repository, which is still using git
submodules, and from there I can begin experimenting. Whether or not this works
remains to be seen, but it coincides neatly with a rewrite of the
backup script to update it to Google Shell Style Guidelines, which means
I can build the script around the new repository layout, and while doing so I
should be able to head off any unforeseen issues.
It’s very likely that I am going to finish writing 2.0 of the script before
doing any of this crazy shit, but this post helps me to organize my thoughts.
Besides, it just means 3.0 will be that much more exciting when it drops.
Stay tuned for more of my antics and adventures with making this absurd system
take shape, and turn into the omnipresent repository of every single facet of
a Minecraft community.
02 Oct 2016
Wow, time flies. It has been almost a year since I last updated this blog,
including fixing some of the issues that Jekyll 3.0 introduced in my formatting.
Luckily, that could be fixed by just adding a few spaces. In the past year,
quite a bit has happened, but nothing quite so exciting as becoming a co-owner
and the head developer of a new Minecraft community called Collegi. Collegi
is a Pixelmon server, which means we have Pokemon right inside Minecraft.
However, we strive to make the server Minecraft with Pokemon, instead of Pokemon
in Minecraft. It’s a small difference, but one that we happen to find very
important. We want the survival aspect of the game to be front and centre.
The server has become absolutely massive, with each downloaded snapshot running
about 100GB in size. (Note, that throughout this article I will be using the
SI standard GB, which is 109, versus the Gibibyte which is
230, how hard drive manufacturers were allowed to change the value of
a gigabyte is something I will never understand.)
Now, with a 500GB flash drive on my MBP, I don’t really have the room to save
all of those snapshots, especially considering we have snapshots going back six
months, across three different major versions of Minecraft. In fact, completely
expanded, the current backup amount at the time of writing is 1.11TB.
So, I began to search for a method of performing backups. I had some rather
strict requirements for these backups, that lead to the formulation of the
system I am going to discuss in this article.
Requirements
- Incremental FTP
- Deduplication
- Compression, and the ability to modify compression levels on the fly.
- Checksumming to silently detect corruption.
- Encryption
- Tools need to be actively maintained and ubiquitous.
- Able to sync repository with a remote source.
- Cheap
- Open source wherever possible.
- Easy to access archived versions.
- Must be able to be automated.
- If not in setup, then in how it runs later.
Step One - Getting the Data off the Server
We use a lovely company called BisectHosting to run our server. They
provide an extremely barebones budget package that gives us a large amount of
our most important specification: RAM. We can live without fancy support tickets
or SSD access if they offer us cheap RAM, which they do. Beyond that, however,
they also offer unlimited disk space, as long as that disk space goes towards
the server itself, so no keeping huge numbers of backups on the server.
Now, they did offer a built in backup solution, but it only keeps the past seven
days available in a rolling fashion, and I really really like to keep backups.
The only real gripe I have about BisectHosting is that they only allow the use
of FTP for accessing data on the Budget Server tier. Worse, they don’t even use
FTP over TLS, so the authentication is in plain text. However, I just change my
password weekly and it seems to work alright.
The most important part of getting the data off the server is only getting the
new data, or the data that has changed. This requires using an FTP Client that
is able to sanely detect new data. Checksums aren’t available, but modification
date and file size work just as well.
There were a large number of clients that I tried out over time. Filezilla
was the first of those. It seemed to work alright for a time, except that when
you have a large amount of identical files (We have 15,824 files at the time of
this writing) it hangs. Now, it does come back eventually, but it’s still not
the best of features to have a client that hangs.
The next one I tried was a Mac favourite known as Cyberduck. I really liked
the interface for Cyberduck, but the first nail in its coffin was the inability
to perform a modification time comparison and a file size comparison during the
same remote to host sync. That meant it took two syncs to grab everything up to
date, and even then it didn’t always seem to take. During the time that I was
using Cyberduck, we had to restore from backup for some reason that is currently
eluding me, but when we did so we noticed that some recent changes on the map
hadn’t synced properly. Combine all of the above with the fact that from time to
time it would hang on downloads (I’m assuming from the absurd number of files)
and that wasn’t going to work.
The final GUI client that I tried was called Transmit. I really, really
enjoyed using Transmit. It is a very polished interface, but first off it
isn’t free, or open source, so that invalidated two of the requirements.
However, if it worked well enough, I was willing to overlook the issues. Problem
was, it didn’t work well. I forget what happened at the moment, but I know that
it experienced similar hanging to Filezilla.
Regardless, Transmit was the last GUI based client that I tried. It took me a
bit to realize, but if I used a GUI client there was a very minimal chance that
I would be able to automate the download.
That left command line tools, which after I found LFTP I kicked myself for
not looking into first. In addition to being an open source tool, LFTP has the
ability to perform multithreaded downloads, which isn’t common in command line
clients. Furthermore, it was able to compare both modification time and file
size simultaneously, reducing the sync operations needed back to one. It is
actively maintained, available in Homebrew (though, at the time of writing
it has been moved into the boneyard), written in C, and very easily scriptable.
You can call commands that would normally have to be ran from inside the FTP
client directly from the command line invokation of LFTP. It handled our data
quantity flawlessly, and easily worked through the large amount of files, though
it can take quite a while to parse our biggest directories. At the time of
writing, that directory is the map data repository for our main world, which has
12,567 items clocking in at 88.15GB. It takes between two and five minutes for
LFTP to parse the directory, which considering all the other benefits is fine
by me.
Our remote to local command utilizes the LFTP mirror function, and from within
the client, looks like this:
mirror -nvpe -P 5 / ~/Development/Collegi/
Step Two - Convert the Data to an Archive Repository
When you are talking about a server that a full backup runs 100GB, and you want
to perform daily backups at minimum, it becomes absurd to think that you could
run a full backup every day. However, the notion of completely incremental
backups is far too fragile. If a single incremental backup is corrupted, every
backup after it is invalid. More than that, to access the data that was on the
server at the time the incremental was taken would require replaying every
incremental up to that point.
The first solution I tried for this problem was to use ZFS. ZFS solves
almost every problem that we have by turning on deduplication and compression,
running it on top of Apple’s FileVault, and utilizing snapshots. The
snapshots are complete moments in time and can be mounted, and they only take
up as much space as the unique data for that snapshot. Using ZFS Snapshots, the
1.10TB of data we had at that time was reduced to 127GB on disk. Perfect. The
problem becomes, however, offsite replication.
Now, it is true that by having a copy of the data on the server, one on my
MacBook, and one on an external drive here at the house, the [3-2-1 Backup][12]
rule is satisfied. However, three backups of the data is not sufficient for a
server that contains over six months of work. It’s reasonable that something
cataclysmic could happen and we’d be shit out of luck. We needed another offsite
location. The only such location that offers ZFS snapshot support is
Rsync.net which 100% violates the “Cheap” requirement mentioned above.
That’s not a knock on their service, Rsync.net provides an incredible service,
but for our particular use case it just wasn’t appropriate.
So the hunt began for a deduplicating, compression based, encrypted backup
solution that stored the repository in standard files on a standard filesystem.
The final contenders were:
I was leaning very, very heavily toward BUP until I discovered BorgBackup. My
primary concerns with BUP was that it did not seem to be under active
development, and after over five years it still had not reached a stable 1.0.
Git would have been useful, but just like ZFS it would inevitably require a
“Smart Server” versus the presentation of just a dumb file-system.
BorgBackup sold me almost immediately. It allowed you to mount snapshots and
view the filesystem as it was at that time, it offers multiple levels of
compression ranging from fast and decent to slow and incredible, and it has
checksumming on top of HMAC encryption. It’s worth noting at this time that
nothing on the server is really so urgent as to require encryption, as most of
the authentication is handled by Mojang, but I still prefer to encrypt things
wherever possible.
It was under active development, it’s developers were active in the community
(I ended up speaking with the lead developer on twitter), and it was progressing
in a sane and stable fashion. As an added bonus, the release of 1.1 was to
provide the ability to repack already stored data, allowing us to potentially
add a heavier compression algorithm in the future and convert already stored
data over to it.
The only downside to Borg was that at first glance it seemed to require a Smart
server, just like git would.
Regardless, the system would work for now. If worst came to worst, I could
utilize something like rclone to handle uploading to an offsite location.
When everything was said and done, we had reduced the size of our 1.11TB backup
into a sane, usable 127GB.
The current command that is used looks like this:
borg create --chunker-params=10,23,16,4095 --compression zlib,9 --stats \
    --progress /Volumes/Collegi/collegi.repo::1.10.2-09292016 .
Step Three - Offsite Replication
I could easily spend a very long time here discussing how I chose the cloud
provider I would inevitably use for this setup, but it really comes down to
the fact that I quite like the company, and their cloud offering has a very
complete API specification, and is dirt cheap. We went with BackBlaze B2.
I could, and probably will, easily write a whole separate post on how enthralled
I am with BackBlaze as a company, but more than that their $0.005/GB/Month price
is literally unbeatable. Even Amazon Glacier runs for $0.007/GB/Month and
they don’t offer live restoration. It’s cold storage as opposed to BackBlaze’s
live storage.
The problem became this: How do I get the Borg repository to fully sync to B2,
but do so in such a way that if the local repository ever became damaged I could
pull back only the data that had been lost. This is what the
documentation for Borg means when it mentions you should really think
about if mirroring best meets your needs, and for us it didn’t.
Again though, B2 is just a storage provider, not a smart server. So how do I set
things up in this way? The answer became to use another tool that was almost
used for backup in the first place, Git-Annex. The only reason git-annex wasn’t
used for backup to begin with is that it doesn’t allow us to retain versioning
information. It just manages large files through git, which wouldn’t work.
What it would do, however, and do quite well, is to act as a layer between our
BorgBackup repository and the cloud.
So, I stored the entire borg repository into git annex. Once this was done, I
used a plugin for git-annex to add support for a B2 content backend. Then,
the metadata information for the git repository gets synced to GitLab, and
the content is uploaded to B2.
Conclusion ## {: #collegi-backup-system-conclusion }
The end result of this is that our 100GB server, as it stands at any day, is
mirrored in four separate locations. One on the host itself, one on the MBP
hard drive, one in the Borg Repository, and one on the BackBlaze B2 Cloud. More
than that though, we have a system that is easily automated via a simple shell
script, which after completing the initial setup (sending 20,000+ files to
Backblaze B2 can take a while), I will demonstrate here.
Thank you so much for reading, I look forward to sharing more about the inner
workings of the Collegi Infrastructure as time permits.
Video
I just recently completed an asciinema of the process. See below. Also note
that you can copy and paste commands from inside the video itself. Go ahead, try
it!